
Category Archives: Call of Duty: Black Ops 7

Unlocking All Lethal Equipment Available in Call of Duty:Black Ops 7

Zombies mode in Call of Duty:Black Ops 7 thrives on speed, positioning, and crowd control. While weapons and perks get most of the attention, Lethal Equipment often determines whether a run collapses early or pushes deep into high rounds. With seven different lethals available-ranging from classic explosives to an elite melee throwable-understanding how to unlock and use each one is critical for survival.

  1. Point Turret – Automated, But Underwhelming

Unlock Level:33

Salvage Cost:300

At first glance, the Point Turret seems useful:deploy it, and it automatically shoots approaching zombies. Unfortunately, its damage output is extremely low compared to other lethals, making it ineffective beyond very early rounds.

In Zombies, the turret struggles to thin hordes or create safe openings, often doing little more than drawing attention. While it performs better in Multiplayer, it simply can’t compete with stronger, more reliable alternatives in Zombies mode.

Verdict:Easily the weakest lethal option available.

  1. Cluster Grenade – Chaotic Area Damage

Unlock Level:5

Salvage Cost:250

The Cluster Grenade explodes on impact and releases several secondary explosives across a wide area. This makes it capable of hitting large groups, but the scatter pattern is unpredictable.

Even with survivability perks, the random blast spread can stagger or lightly damage you, and it’s difficult to use safely when training zombies in tight routes. While fun and flashy, its inconsistency limits its long-term usefulness.Practice better. Progress faster. Dominate smarter—with MMOexp CoD Black Ops 7 Bot Lobbies.

Verdict:Decent early-game, unreliable later.

  1. Molotov – Reliable Fire Damage Over Time

Unlock Level:26

Salvage Cost:350

Molotovs create a pool of fire that continuously burns zombies who pass through it. This makes them effective for area denial and particularly strong against Zursa Zombie Bears, which take bonus fire damage.

That said, Molotovs have clear downsides. Fire zones linger longer than expected and can chip away at your health when repositioning. They also lack the instant crowd-clearing power of explosives, and their damage doesn’t scale well into later rounds.

Verdict:Strong early utility, limited late-game impact.

  1. C4 – Maximum Control, Maximum Commitment

Unlock Level:41

Salvage Cost:400

C4 offers massive damage and total detonation control. You can place multiple charges, lure zombies into position, and trigger devastating explosions that wipe entire groups.

However, C4 requires planning and precision. Setting traps takes time, herding zombies into the blast zone is risky, and the delay between placement and detonation can be deadly in confined spaces. On top of that, it’s the most expensive lethal to craft.

Verdict:Extremely powerful, but best suited for experienced players.

  1. Frag Grenade – The Timeless Classic

Unlock Level:Default

Salvage Cost:250

The Frag Grenade remains one of the most versatile tools in Zombies. You can cook it for precise timing, bounce it off surfaces, or drop it behind you while training.

Its damage remains relevant far into higher rounds with good positioning. The only real drawback is the need to cook it, which can interrupt sprinting when escaping tight situations.

Verdict:Reliable, flexible, and effective for all skill levels.

  1. Semtex – Fast and Foolproof

Unlock Level:12

Salvage Cost:250

Semtex grenades prioritize speed and simplicity. There’s no cooking, no bouncing, and no guesswork-throw it, stick it, and clear the area.

Its sticky nature ensures consistent placement, making it ideal for hallways, panic situations, or fast-paced playstyles. This makes Semtex one of the safest lethals for newer players and an excellent option for testing strategies in controlled environments.

Verdict:One of the most dependable explosives in BO7 Zombies.

  1. Combat Axe – The Ultimate Zombies Lethal

Unlock Level:54

Salvage Cost:200

The Combat Axe stands above every other lethal in Black Ops 7 Zombies.

What makes it exceptional:

One-hit kills on standard zombies at any round

Fully retrievable after use

Fast throw speed

Extremely low crafting cost

Damage scales infinitely

Unlike explosives that fall off over time, the Combat Axe remains lethal forever. It’s a favorite among speedrunners and high-round players for good reason.

Choosing the right Lethal Equipment can dramatically improve your survivability, efficiency, and overall Zombies performance. Whether you’re pushing for high rounds or refining movement and rotations, mastering lethals is just as important as weapon choice in Call of Duty:Black Ops 7 Zombies.Whether you’re learning the basics or polishing advanced strategies, MMOexp buy Black Ops 7 Bot Lobbies provide a safe, relaxed space to play, experiment, and improve without pressure.
How to Master the Ashes of the Damned Map in Call of Duty: Black Ops 7 Zombies

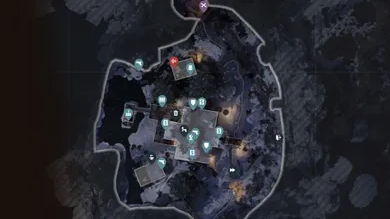
Whether you’re looking to farm Essence safely, unlock Pack-a-Punch quickly, or power up your loadout with early upgrades, this optimized walkthrough breaks down the fastest and most efficient early-game route in Black Ops 7 Zombies: Ashes of the Damned. By following these steps, you’ll secure your core perks, upgrade your weapon, and prepare for Zursa long before the mid-game difficulty spike hits.

This guide is tailored for players who want a smooth progression curve, but it’s equally useful for mastery grinders, camo hunters, and those practicing routes in Call of Duty Black Ops 7 Bot Lobbies or other controlled environments used by players who buy CoD Black Ops 7 Bot Lobbies for stress-free optimization.

Round 1-3: Free T.E.D.D., Maximize Essence & Unlock Ol’ Tessie

Your first three rounds set the foundation for the entire run. Every action should be focused on earning as much Essence as possible, and the fastest way to do that is through Critical Kills, which reward 115 Essence each.

Once you reach 1,250 Essence, leave Janus Towers Plaza and head south toward the Server Room. Inside, look at the southwest corner for a metal floor grate. Melee it to reveal T.E.D.D.’s head, then carry it outside to the rusty truck known as Ol’ Tessie. Insert the head to activate the vehicle-unlocking your most valuable tool for map traversal, farming, and mobile Pack-a-Punch later in the match.

By Round 3, you should be driving Tessie out of the plaza and toward your first major objective.

Turn on the Power at Vandorn Farm

Vandorn Farm is one of the best early-game areas, offering wide-open space for training and easy access to your first Perks and Arsenal.

Drive east from Janus Towers Plaza, following the foggy road. Smash through wooden barriers and hit green Dark Aether plants to heal Tessie and gain free Essence-just avoid the red ones, which damage her.

Once you arrive:

1. Head to the northern Power Pump.

2. Shoot all glowing bulbs within 30 seconds.

3. Spend 1,750 Essence to unlock the Barn.

4. Go upstairs to flip the Power Switch.

With power active, Vandorn Farm becomes a fully-equipped hub where you can buy Perks, access The Arsenal, and begin farming efficiently. Stay here until you earn enough for Tier 2 Armor (4,000 Essence) and push toward 5,000 Essence before moving on.

Head to Ashwood for Pack-a-Punch (Rounds 7-10)

Once you’re decently geared at Vandorn Farm, drive Tessie south toward the Grounded Ship, then push onward to Ashwood, the central progression zone of the map.

Here’s the optimal sequence:

1. Park Tessie near the locked garage.

2. Use the zipline to reach Ashwood’s upper level.

3. Spend 1,000 Essence to open Market Square.

4. Spend 1,750 Essence to unlock Judgement Square.

5. Activate the second Power Pump and flip the switch.

6. Return to the garage.

7. Pack-a-Punch Ol’ Tessie, unlocking boost and mobile PaP.

This is one of the biggest early-game power spikes. You now have access to weapon upgrades anywhere you go.

Upgrade Your Weapon, Armor, and Perks

After activating Pack-a-Punch, farm until you have 5,000 Essence to upgrade your primary weapon. Immediately follow this with a weapon rarity upgrade at The Arsenal using 500 Salvage.

Next, secure your first essential Perks:

·Jugger-Nog (The Ruby Rabbit) – boosts max health

·Vulture Aid (Market Square) – increases drop frequency, Salvage, and Essence

This setup provides strong survivability while significantly accelerating your resource generation.

By Round 10, you should have:

·A Pack-a-Punched primary

·Tier 2 Armor

·Tier 1-2 weapon rarity

·2-3 Perks

·Ol’ Tessie Pack-a-Punched and mobile

Open Exit 115, Buy Deadshot Daiquiri & Upgrade to Tier 3 Armor

Exit Ashwood by driving southwest through the Orda Graveyard toward Exit 115. This region offers wide lanes and safe angles for long-range farming.

Open McDougal’s Service Station (500 Essence), granting access to:

·Deadshot Daiquiri, which boosts critical damage and auto-aim precision, and massive DPS increase for many weapons.

Stay here until you reach 10,000 Essence, then purchase Tier 3 Armor, one of the largest single survivability buffs in the game.

Once finished, drive northwest to Blackwater Lake:

·Activate its Power Pump

·Spend 1,750 Essence to enter the cabin.

·Buy Speed Cola on the upper floor

Finally, return to the Server Room near Janus Towers Plaza to purchase Quick Revive, boosting health regeneration and synergy with Jugger-Nog.

Complete T.E.D.D. Tasks & Prepare for the Zursa Boss Fight

Once the mid-game begins, you’ll periodically see alerts stating “A T.E.D.D. Task Has Appeared.” Always complete these-they offer:

·Free Perks

·Weapon rarity upgrades

·Essence

·Salvage

·Useful equipment

Use Salvage to buy the Napalm Burst Ammo Mod, which drastically increases your damage against armored enemies and bosses-especially the incoming Round 16 bear.

Round 16: Zursa Fight Strategy

By this time, your setup should include:

·Tier 3 Armor

·Pack-a-Punched primary

·At least Tier 2 rarity

·Napalm Burst

·4-5 Perks

·Mobile Pack-a-Punch from Tessie

To defeat Zursa:

·Aim for its glowing weak points.

·Maintain distance

·Apply consistent Napalm Burst Do.T

·Circle around obstacles to avoid charge attacks

Many players practice this encounter through Call of Duty Black Ops 7 Bot Lobbies, and those who buy CoD Black Ops 7 Bot Lobbies often use them specifically for safe boss practice.

Final Tips for Mastery

After defeating your first Zursa:

·Continue farming T.E.D.D. Tasks

·Expand your Perk load. ut

·Upgrade to Pack-a-Punch Tier 3

·Push weapon rarity higher.

·Unlock more map locations.s

Mastering these first 16 rounds gives you a flawless start for Black Ops 7 Zombies: Ashes of the Damned, ensuring smoother survival, faster farming, and more efficient camo grinding all season long.